Home Lab – Update & Diagram

For many years, I had a Dell PowerEdge 710 as the compute node of my home lab. In 2021 I finally decided to cross-grade to a cluster and reduce power consumption. I bought 3 Dell OptiPlex Micros and went about the process of migrating all of my VMs from ESXi to xcp-ng. Now I’m saving a little power, and I have the flexibility to rolling upgrades and HA. The nodes are still using shared storage on the TrueNAS server (like ESXi was). The only real limitation is that everything is restricted to a single 1G Ethernet on each node. So far, this hasn’t been an issue, even when doing Live Migrations, but I’d like to get some mGig gear and get the storage server connected over 10G again.

Here’s the basic blocks of the current lab environment.

Icinga 2 Quick Start

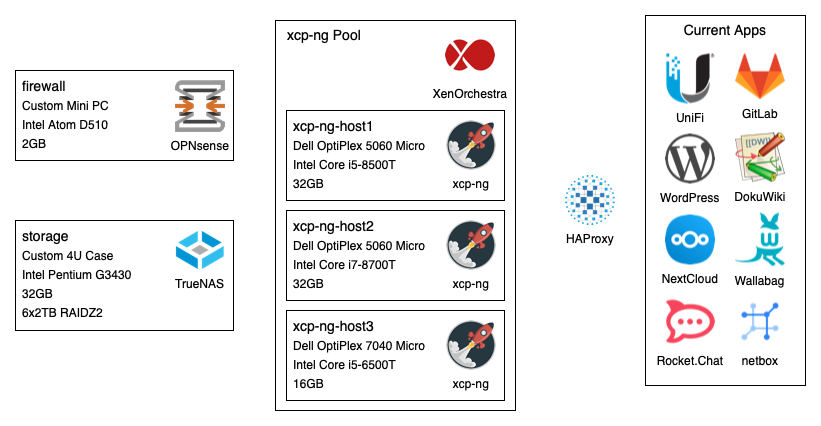
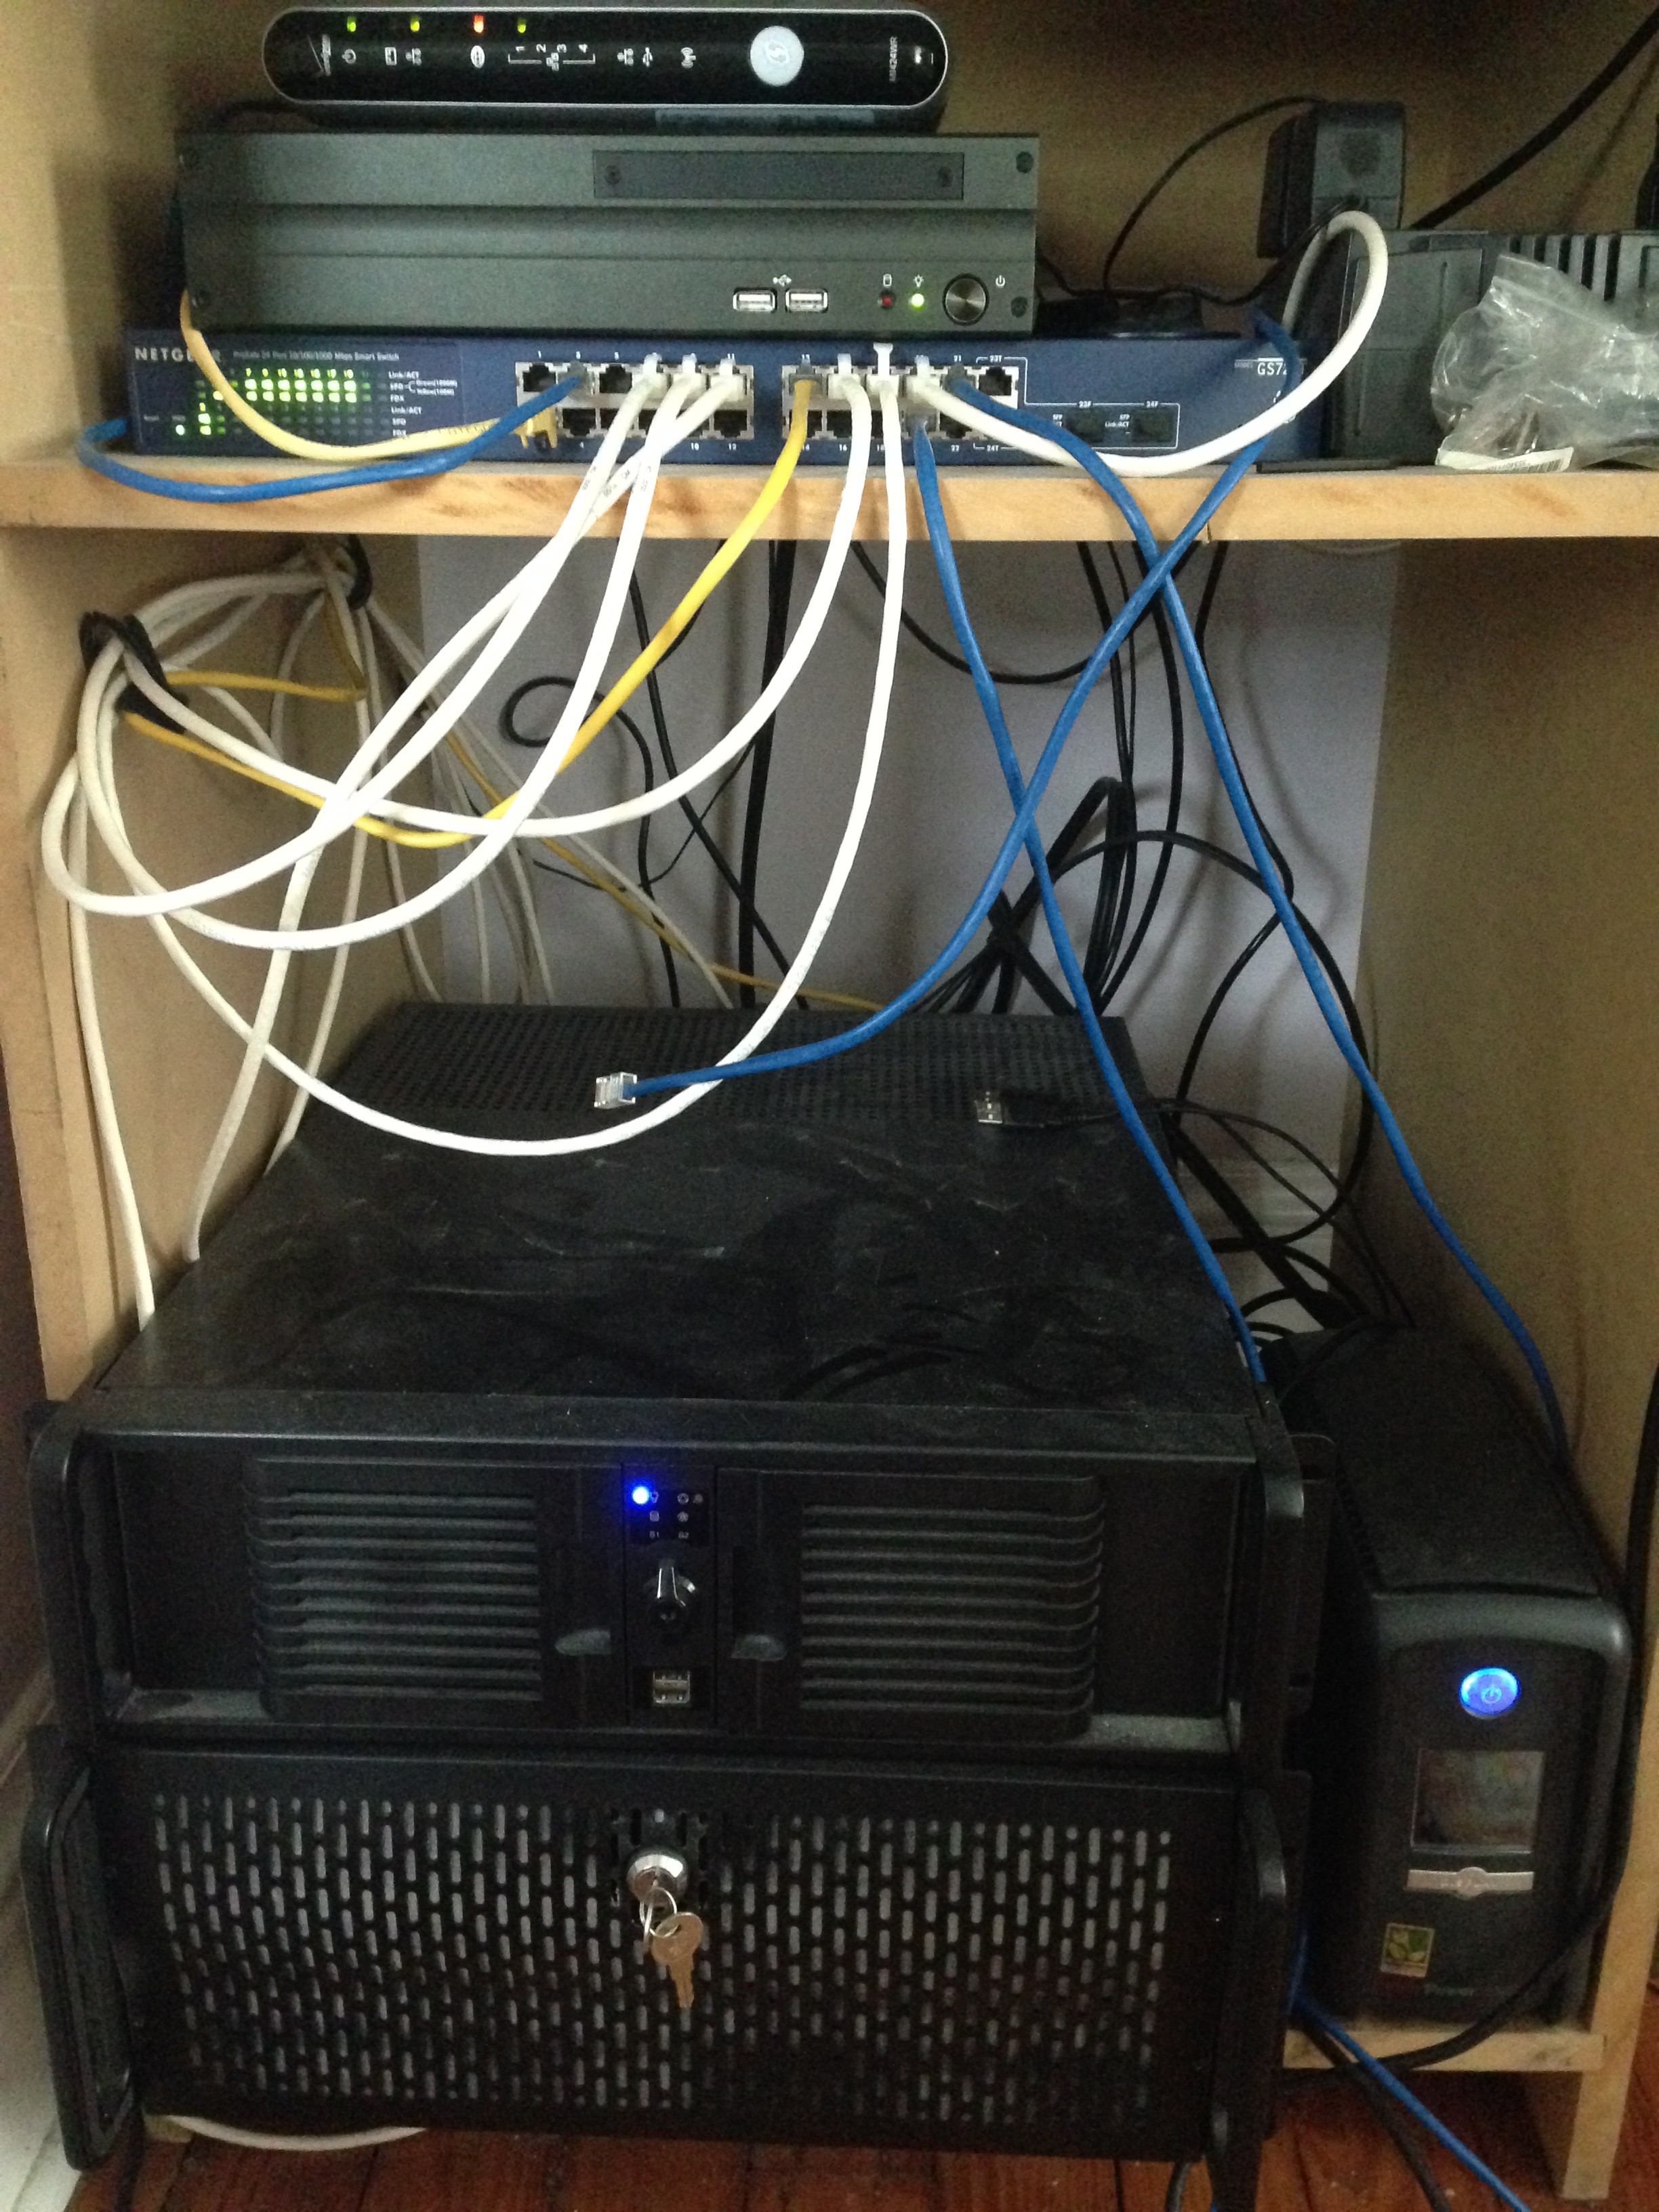
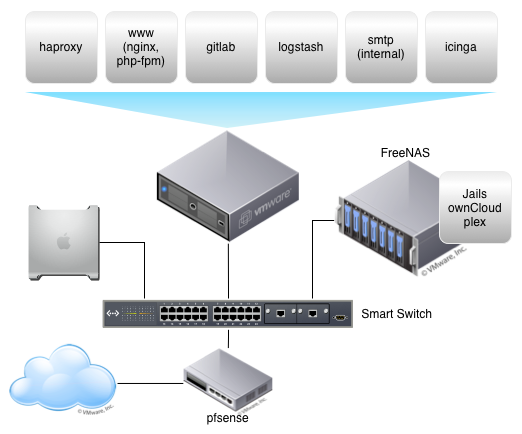
My lab network has been missing monitoring for its entire existence, and a week ago, I would have considered it the only major software category not present. Some time ago, I made a screencast and blog post on installing Icinga with Postgres, but never got much further with actual usage. This week, I decided to try an Icinga install again.

Part of the motivation to try again, was stripped down How To from Digital Ocean (How To Use Icinga To Monitor Your Servers and Services On Ubuntu 14.04), which I followed and got a basic Icinga 1 install running. I had to dig to fill in some gaps, but came out with a much better understanding of Icinga itself.

Icinga 2 was recently released, and I decided to try for the ‘latest & greatest’ in my lab, since the knowledge was at least somewhat transferrable between Icinga and Nagios if I ever encountered them. I began by reading the Getting Started guide, but found the guide contained too many disclaimers and variations to be useful as a Quick Start. After burning through a few VMs, I parred down the content of the Getting Started section, in to a Quick Start Guide for Icinga 2 w/ Icinga Web.

I started with a fresh Minimal CentOS 6 install. The Icinga 2 packages require some elements from the EPEL Repository, so we add that first. Then we add the Icinga repository and sync the repo listings.

# yum install http://mirror.pnl.gov/epel/6/i386/epel-release-6-8.noarch.rpm
# rpm --import http://packages.icinga.org/icinga.key
# curl http://packages.icinga.org/epel/ICINGA-release.repo -o /etc/yum.repos.d/ICINGA-release.repo
# yum makecache

I struggled with access when I tried Icinga on PostgreSQL previously, so I opted for MySQL. This will install MySQL, start it, set it to start on boot, and allow you to configure a root password.

# yum install mysql-server
# service mysqld start
# mysql_secure_installation

Now we are ready to actually install Icinga 2.

# yum install icinga2
# yum install nagios-plugins-all
# yum install icinga2-ido-mysql
# mysql -u root -p
mysql>  CREATE DATABASE icinga;
mysql>  GRANT SELECT, INSERT, UPDATE, DELETE, DROP, CREATE VIEW, INDEX, EXECUTE ON icinga.* TO 'icinga'@'localhost' IDENTIFIED BY 'icinga';
mysql> quit

# mysql -u root -p icinga < /usr/share/doc/icinga2-ido-mysql-2.0.1/schema/mysql.sql

# vi /etc/icinga2/features-available/ido-mysql.conf
##Remove comment markings
##Password should match the SQL GRANT used above

# icinga2-enable-feature ido-mysql
# icinga2-enable-feature command

# service icinga2 restart

This will install Icinga 2, the Monitoring Plugins, and the IDO Utils for MySQL which will be needed later for Icinga-Web later.

Now we will install the web interface. I’m not quite bold enough to try the Experimental Icinga 2 UI, so we will just use the Icinga 1.x interface (1.x is not Classic).

# yum install icinga-web icinga-web-mysql php-mysql

# usermod -a -G icingacmd apache

# vi /etc/icinga-web/conf.d/access.xml
 <resource name="icinga_pipe">/var/run/icinga2/cmd/icinga2.cmd</resource>

# mysql -u root -p
mysql>  CREATE DATABASE icinga_web;
mysql>  GRANT SELECT, INSERT, UPDATE, DELETE, DROP, CREATE VIEW, INDEX, EXECUTE ON icinga_web.* TO 'icinga_web'@'localhost' IDENTIFIED BY 'icinga_web';
mysql> quit

# mysql -u root -p icinga_web < /usr/share/doc/icinga-web-1.11.0/schema/mysql.sql

# icinga-web-clearcache

Here we have installed the requisite packages (I found that php-mysql was not a dependency and had to be installed explicitly). Then we add the web server user to the icingacmd group. This gives the web server access to the file specified by “icinga_pipe” so we can control Icinga from the web interface.

If you navigate to http://server-address/icinga-web, you should be greeted by the login page. Default username and password on RedHat installs is root:password. If everything is working, you should have a few services being checked on the new server and be able to tell Icinga to run commands. (i.e.-run this check right now)

A quick comment on the configuration I discovered.

If you check out /usr/share/icinga2/include/command-plugins.conf, you’ll see that commands have an ‘arguments’ which has a command line flag and a variable. You can pass these in your checks by adding “vars.variable_name” in your Service Object.

/usr/share/icinga2/include/command-plugins.conf
object CheckCommand "http" {
        import "plugin-check-command"

        command = PluginDir + "/check_http"

        arguments = {
                "-H" = "$http_vhost$"
                "-I" = "$http_address$"
                "-u" = "$http_uri$"
                ...
                "-w" = "$http_warn_time$"
                "-c" = "$http_critical_time$"
        }

        vars.http_address = "$address$"
        vars.http_ssl = false
        vars.http_sni = false
}

/etc/icinga2/conf.d/hosts/www
object Service "blog" {
  import "generic-service"

  host_name = "nginx"
  check_command = "http"
  vars.http_vhost = "blog.slatehorizon.com"
  vars.sla = "24x7"
}

The ‘command-plugins’ file and that tip should help you quickly get basic monitoring setup going.

Home Lab Setup

Been making a good bit of changes since my last post. It’s been almost a year, so that’s not surprising. In this post, I just want to bring the blog up to date on my home lab setup.

Here is a pic of the current hardware:

"rack"
“rack”

From top to bottom:
Top Shelf:
Verizon FiOS Router (bridged)
pfSense Router (DNS, DHCP, NTPD, VLANS)
Netgear GS724T (24-port Gigabit L2 Switch)
CyberPower UPS (far right)
[Unpictured: Belkin Wireless Router)

Lower “Rack”:
White Box ESXi Host (ESXi 5.5, Xeon X3440, 16GB)
FreeNAS Storage (FreeNAS 9.2.1.6, 16GB, 6x 2TB RAIDZ2 w/ ZIL on BBU add-on card)
CyberPower UPS (right)

Cabling isn’t as pretty as it has been, but adding experimental hardware, reorganizing bits, etc, it’s come undone a bit.

Now for the actually infrastructure.
Network Layout

The graphic should be fairly self explanatory. I will post about the individual services in the future.

Blog Migration / Setting Up WordPress on nginx

Recently, I have begun hosting several web services on my home network, and have a few projects I’d like to be able to host. I have been hosting my sites on Amazon for a few years, but now that I have a reliable setup, I figured it was time to migrate everything internally. Unfortunately, my current services each have their own servers, and are distinct enough in purpose that pooling them (or new ones) would not make much sense. Most of my upcoming projects will be websites (and it opens up the potential for additional income).

On to my nginx configuration and WordPress install.

I started with a bare CentOS server, added the nginx repo, and installed all the necessary software for this project.

#add nginx repo
cat > /etc/yum.repos.d/nginx.repo << \EOF
[nginx]
name=nginx repo
baseurl=http://nginx.org/packages/centos/6/$basearch/
gpgcheck=0
enabled=1
EOF

#install nginx
yum -y install nginx

#install necessary software
yum -y install wget mysql-server php-fpm php-xml php-mysql

Now that we have all the required software, we can start to configure it. I'm going to start with the database, but WordPress won't work until all of these steps are completed, no matter what order.

chkconfig mysqld on
service mysqld start
mysql_secure_installation

mysql -u root -p
> CREATE DATABASE wordpress;
> GRANT ALL PRIVILEGES ON wordpress.* TO "wordpress"@"localhost" IDENTIFIED BY "password";
> FLUSH PRIVILEGES;
> EXIT

And now, configure PHP to provide a pool and work within the permissions of nginx, by editing /etc/php-fpm.d/www.conf

listen = /var/run/php5-fpm.sock
user = nginx
group = nginx

chkconfig php-fpm on
service php-fpm start

Ok, time to install WordPress:

mkdir -p /var/www/blog/{htdocs,logs}

#download wordpress
cd /var/www/blog/htdocs/
wget http://wordpress.org/latest.tar.gz
tar --strip-components=1 -xvf latest.tar.gz

#update permissions
cd /var/www/blog/htdocs/
chown -R root:root .
chown -R nginx:nginx wp-content wp-admin/update* wp-admin/network/update*

And, finally, configure nginx:

cat > /etc/nginx/php.conf << \EOF
location ~ \.php {
        # for security reasons the next line is highly encouraged
        try_files $uri =404;

        fastcgi_param  QUERY_STRING       $query_string;
        fastcgi_param  REQUEST_METHOD     $request_method;
        fastcgi_param  CONTENT_TYPE       $content_type;
        fastcgi_param  CONTENT_LENGTH     $content_length;

        fastcgi_param  SCRIPT_NAME        $fastcgi_script_name;

        # if the next line in yours still contains $document_root
        # consider switching to $request_filename provides
        # better support for directives such as alias
        fastcgi_param  SCRIPT_FILENAME    $request_filename;

        fastcgi_param  REQUEST_URI        $request_uri;
        fastcgi_param  DOCUMENT_URI       $document_uri;
        fastcgi_param  DOCUMENT_ROOT      $document_root;
        fastcgi_param  SERVER_PROTOCOL    $server_protocol;

        fastcgi_param  GATEWAY_INTERFACE  CGI/1.1;
        fastcgi_param  SERVER_SOFTWARE    nginx;

        fastcgi_param  REMOTE_ADDR        $remote_addr;
        fastcgi_param  REMOTE_PORT        $remote_port;
        fastcgi_param  SERVER_ADDR        $server_addr;
        fastcgi_param  SERVER_PORT        $server_port;
        fastcgi_param  SERVER_NAME        $server_name;

        # If using a unix socket...
        fastcgi_pass unix:/var/run/php5-fpm.sock;

        # If using a TCP connection...
        #fastcgi_pass 127.0.0.1:9000;
}
EOF

cat > /etc/nginx/drop.conf << \EOF
location = /robots.txt  { access_log off; log_not_found off; }
location = /favicon.ico { access_log off; log_not_found off; }
location ~ /\.          { access_log off; log_not_found off; deny all; }
location ~ ~$           { access_log off; log_not_found off; deny all; }
EOF

cat > /etc/nginx/conf.d/blog.conf << \EOF
server {
        server_name blog.example.com;

        root            /var/www/blog/htdocs;
        index           index.php;

        access_log      /var/log/nginx/blog.access.log;
        error_log       /var/log/nginx/blog.error.log;

        location / {
                try_files $uri $uri/ /index.php;
        }

        location @rewrites {
                rewrite ^ /index.php last;
        }

        # This block will catch static file requests, such as images, css, js
        # The ?: prefix is a 'non-capturing' mark, meaning we do not require
        # the pattern to be captured into $1 which should help improve performance
        location ~* \.(?:ico|css|js|gif|jpe?g|png)$ {
                expires max;
                add_header Pragma public;
                add_header Cache-Control "public, must-revalidate, proxy-revalidate";
        }

        # remove the robots line if you want to use wordpress' virtual robots.txt
        location = /robots.txt  { access_log off; log_not_found off; }
        location = /favicon.ico { access_log off; log_not_found off; }

        # this prevents hidden files (beginning with a period) from being served
        location ~ /\.          { access_log off; log_not_found off; deny all; }

        include php.conf;
}
EOF

#Ready to configure WordPress
cp /var/www/blog/htdocs/wp-config{-sample,}.php
chown -R nginx:nginx /var/www/blog/htdocs/wp-config.php
sed -i -e 's/database_name_here/wordpress/' wp-config.php
sed -i -e 's/username_here/wordpress/' wp-config.php
sed -i -e 's/password_here/wordpresspassword/' wp-config.php
SALT=$(curl -L https://api.wordpress.org/secret-key/1.1/salt/)
STRING='put your unique phrase here'
printf '%s\n' "g/$STRING/d" a "$SALT" . w | ed -s wp-config.php
sed -i -e 's/\r$//' wp-config.php

To make sure we can get to the server:

COUNT=`expr $(iptables -L INPUT | wc -l) - 2`; iptables -I INPUT $COUNT -m state --state NEW -p tcp --dport 80 -j ACCEPT

At this point, just navigate to the WordPress site, blog.example.com, and follow the prompts. Permissions should all be set appropriately so that everything should be possible from the site itself.

References

Using HAProxy to Host Multiple Subdomains

I was recently given cause to find an alternative to Dropbox for syncing files and creating a basic backup. I wanted to host this on my own systems on my home network. OwnCloud is the leading open-source file syncing utility. It uses standard HTTP/S for syncing, making it firewall friendly, but HTTP runs on port 80, and I already had Port 80 occupied. I could manually configure a port, but that just seems ugly to me, so instead I looked in to it and decided I needed a Reverse Proxy.

Here’s my setup:

Internet
   |
Firewall ------ HAPRoxy
            _______|_______
           |               |
       ownCloud          Other

Using this blog post, I was able to quickly get this setup.

frontend slatehorizon
bind 172.16.0.1:80
mode http
acl is_cloud hdr_dom(host) -i cloud
acl is_guac hdr_dom(host) -i guacamole
use_backend cloud if is_cloud
use_backend guac if is_guac

backend cloud
balance roundrobin
option httpclose
option forwardfor
server cloud1 172.16.0.10

backend guac
balance roundrobin
option httpclose
option forwardfor
server guac1 172.16.0.20:8080

You’ll note that each domain can still operate with independent load balancing were that to be needed. And I am even able to redirect to HTTP running on Tomcat.

The biggest pain in all this was that these services should be secure. Unfortunately, I found no way to do it…for both. At the moment, any HTTPS traffic goes straight to the OwnCloud backend.

VNC through SSH Jumpbox

Work decided to send me on a trip, but I am working on projects on my home computer, that I need graphic access with. So over the weekend in preparation for this trip, I implemented some security and VNC access to my home machine.

First, a little backstory. (Skip ahead if you just want the solution.) For several months I was having computer trouble with my Hackintosh. Random hangs and freezes and crashing. This was a bit of a pain, but what really made it bothersome was the terminal sessions I had spawned and losing everything I had in those.

I had come to the conclusion that I should setup some sort of jump box, ssh in to that and then use tmux (or screen) to hop out to my other machines. This way, if my Desktop went down, I could pick up where I left off via the jump box.

Well now the crashing issues have been resolved, but I felt it good practice, as the jumpbox would be more reliable, and I could secure it better than I could on my Desktop. So as part of my VNC access to my desktop, I setup the jumpbox.

There’s nothing all that special about it as it stands. Just a fairly standard secure sshd_config. Then reconfiguring my router to port forward to the jumpbox instead of my Desktop.

The fun part of this was then figuring out tunnelling for the purpose of securing a VNC connection. Due to using a jumpbox, I am unable to create the tunnel directly on the desktop like every example ever presented on the subject.

Also, it would be nice to not ever actually ssh in to the jumpbox. So this led me to find the ProxyCommand option. Unfortunately, all the examples demonstrate setting up an ssh_config file but didn’t fully explain what exactly the options were, or how they would work on the command line.

To ssh directly in to my desktop, the follow could be run from the command line (obviously obfuscated):

$ ssh alan@192.168.1.10 -o “ProxyCommand ssh alan@home.dynamicdns nc 192.168.1.10 22 2>/dev/null”

Running this command, you’ll be prompted for a password to the jumpbox, then again for the desktop.

OK, so now we have a working baseline for tunnelling through the jumpbox.

Now we just have to add the port forwarding.

$ ssh alan@192.168.1.10 -o “ProxyCommand ssh alan@home.dynamicdns nc 192.168.1.10 22 2>/dev/null” -f -L 5903:localhost:5900 -N

Again, authenticate with the jumpbox and desktop. And now, connecting to port 5903 on the local machine will connect to the VNC server running on 5900 on the desktop machhine back at home. On a pretty typical linux setup, I would run something like:
$ vncviewer localhost:5903

And I can add any command line options as far as bit-depth and encoding.

$ vncviewer -AutoSelect=0 -LowColorLevel=2 localhost:5903

This automatically selects an encoding type, does 256 colors and connects to the VNC session.

Hope this helps out some people.

Icinga Install

I would like to get in to a more SysAdmin role, so I’ve been using a home lab to try to learn new tech. So I spent a few days  putting together a step-by-step run through for installing Icinga. This did two things: 1) I had to learned Icinga enough to use it 2) I had to understand installation enough to explain in.

I haven’t been much of a fan of MySQL, particularly since Oracle, so I wanted a PostgreSQL database, which took a bit of research to get it to not bug out. I refined the process down to a few steps.

This is only for Icinga w/ Postrgres on Enterprise Linux derived systems.

Below is the notes I worked from while making the videos. Note that I used Scientific Linux Minimal Installs to start, so I had to install everything I needed as I needed it.

[EXPAND Video Notes]

#Server Install Steps

yum -y install httpd gcc glibc glibc-common gd gd-devel make
yum -y install libjpeg libjpeg-devel libpng libpng-devel
yum -y install postgresql postgresql-server libdbi libdbi-devel libdbi-drivers libdbi-dbd-pgsql
yum -y install lynx wget
yum -y install man ntpd

#Add icinga user
useradd -m icinga
passwd icinga

#Configure user for web interface
groupadd icinga-cmd
usermod -a -G icinga-cmd icinga
usermod -a -G icinga-cmd apache

cd /usr/src

#Download Icinga
lynx icinga.org

#Download Plugins
lynx nagiosplugins.org

#Install icinga
tar xzf icinga-1.5.1.tar.gz
cd icinga-1.5.1
./configure --with-command-group=icinga-cmd --enable-idoutils
make all
make fullinstall
make install-config

#Use the sample configs
cd /usr/local/icinga/etc/
cp ido2db.cfg-sample ido2db.cfg
cp idomod.cfg-sample idomod.cfg

#Enable idomod event broker module
vi /usr/local/icinga/etc/icinga.cfg
#Uncomment the example

#Setup the database
service postgresql initdb
service postgresql start
chkconfig postgresql on
su - postgres
> psql
>> CREATE USER icinga;
>> ALTER USER icinga WITH PASSWORD 'icinga';
>> CREATE DATABASE icinga;
> createlang plpgsql icinga;

#Trust
vi /var/lib/pgsql/data/pg_hba.conf
#icinga
local    icinga     icinga                    trust

#Reload config
service postgresql reload

#Build the schema
cd /usr/src/icinga-1.5.1/module/idoutils/db/pgsql
psql -U icinga -d icinga < pgsql.sql

#Edit the config to use Postgres
vi /usr/local/icinga/etc/ido2db.cfg

#Install the Classic Web Interface
cd /usr/src/icinga-1.5.1
make cgis
make install-cgis
make install-html
make install-webconf

#Create an htuser
htpasswd -c /usr/local/icinga/etc/htpasswd.users icingaadmin

#Restart Apache
service httpd restart

#Install nagios plugins
cd /usr/src/
tar nagios-plugins-1.4.15.tar.gz
cd nagios-plugins-1.4.15

./configure --prefix=/usr/local/icinga --with-cgiurl=/icinga/cgi-bin --with-htmurl=/icinga --with-nagios-user=icinga --with-nagios-group=icinga
make
make install

#Configure SELinux
#getenforce
#setenforce 0 #go to permissive

chcon -R -t httpd_sys_script_exec_t /usr/local/icinga/sbin/
chcon -R -t httpd_sys_content_t /usr/local/icinga/share/
chcon -t httpd_sys_script_rw_t /usr/local/icinga/var/rw/icinga.cmd

#Startup icinga
service ido2db start
/usr/local/icinga/bin/icinga -v /usr/local/icinga/etc/icinga.cfg
service icinga start

chkconfig --add icinga
chkconfig icinga on

#Open firewall
vim /etc/sysconfig/selinux
iptables -A INPUT -m state --state NEW -p tcp --dport 80 -j ACCEPT
service iptables save

#Install NRPE
cd /usr/src/
wget "https://git.icinga.org/?p=icinga-nrpe.git;a=snapshot;h=HEAD;sf=tgz" -O nrpe.tgz
tar xzf nrpe.tgz
cd icinga-nrpe

yum -y install openssl openssl-devel
./configure --enable-ssl
make all
make install-plugin

cd /usr/local/icinga/etc/objects/

#Add NRPE to the commands
vi commands.cfg

define  command {
command_name    check_nrpe_command
command_line    $USER1$/check_nrpe -H $HOSTADDRESS$ -c $ARG1$
}

define  command {
command_name    check_nrpe_command_args
command_line    $USER1$/check_nrpe -H $HOSTADDRESS$ -c $ARG1$ -a $ARG2$
}

#add host to objects

#reference object in icinga.cfg

##########
yum -y install php php-cli php-pear php-xmlrpc php-xsl php-pdo php-gd php-ldap php-pgsql
yum -y install epel-release  && 
yum -y install php-pear-phing && 
yum -y install php-pear-PHP-CodeSniffer
lynx http://sourceforge.net/projects/icinga/files/icinga-web/
#wget http://sourceforge.net/projects/icinga/files/icinga-web/1.5.2/icinga-web-1.5.2.tar.gz/download
#wget "https://git.icinga.org/?p=icinga-web.git;a=snapshot;h=HEAD;sf=tgz" -O icinga-web.tgz
tar xzvf icinga-web-1.5.2.tar.gz

./configure 
--prefix=/usr/local/icinga-web 
--with-web-user=apache 
--with-web-group=apache 
--with-web-path=/icinga-web 
--with-web-apache-path=/etc/httpd/conf.d 
--with-db-type=pgsql 
--with-db-host=localhost 
--with-db-port=5432 
--with-db-name=icinga_web 
--with-db-user=icinga_web 
--with-db-pass=icinga_web 
--with-api-subtype=pgsql 
--with-api-port=5432 
--with-api-db-pass=icinga_web 
--with-conf-folder=etc/conf.d 
--with-log-folder=log 
--with-db-socket=/usr/local/icinga/var/ido.sock 
--with-api-cmd-file=/var/icinga/rw/icinga.cmd

make install

vi /etc/php.ini
#date.timezone = America/New_York

su - postgres
> psql
>> CREATE USER icinga_web;
>> ALTER USER icinga_web WITH PASSWORD 'icinga_web';
>> CREATE DATABASE icinga_web;
#> createlang plpgsql icinga;

vi /var/lib/pgsql/data/pg_hba.conf
#icinga_web
host    icinga          icinga            ::1/128         trust
host    icinga_web      icinga_web      ::1/128         trust

service postgresql reload
make db-initialize

make install-apache-config
make install-done

#disable SELinux for the moment while I figure out the permissions
setenforce 0

#Disable the welcome.conf config
#comment out all the lines in
/etc/httpd/conf.d/welcome.conf

#Load the site
http://host/icinga-web

[/EXPAND]

[EXPAND Videos]

[/EXPAND]

Quick Lab Update

I’ve been ignoring the blog, not the work. Took a bit more time than I would have liked, but I’ve got everything up. Well, except the switch. Not comfortable enough with that yet, so everything is on the same LAN right now.

Just wanted to post about the last week. I decided to have a go at setting up a completely virtualized lab. I used this TechHead article (VMware vSphere ESX: Install, Configure, Manage – Preparing your Test Lab). It’s a little dated, but everything still works as advertised, only version numbers have really changed.

Learned a lot more Vyatta than I expected to have to, learned a bit more about FreeNAS and OpenFiler. Honestly it was a  huge pain, and I’m not at all happy with the results. That is mainly because after I finally get things working slowly but surely, I can only run 32-bit VMs inside the vESXis. Which is fine I supposed, just it was never mentioned in the article explaining how to setup a lab for study. Major information oversight.

I’m keeping the VMs around if I decide to pull them out later, but I’ll probably start on another route for the time being. I’ll try to post over the next few days about my experiences this week.

New Home Lab Ordered

Well, I ordered hardware for my new lab Wednesday night. Several packages should be arriving today, but it will be Wednesday next week til the rest of the packages have arrived and I have time to put everything together.

I ordered everything from Newegg:

  • iStarUSA D-300-PFS
  • ASUS P7F-X
  • Intel Xeon 3440
  • Crucial 8GB (2 x 4GB) DDR3 1333
  • Antec EarthWatts Green EA-380D
  • 3x Samsung Spinpoint F3 1TB
  • Netgear GS724T-300NAS Gigabit Smart Switch

The plan is to migrate everything on the current ESXi host to the tiny storage server. (This is mostly complete already as I was expecting to have to do a reinstall before.) The 3x drives will then be placed in the old host, loaded with FreeNAS 8, and a RAIDZ pool configured. I’m hoping to be able to run some tests, see how 4GB of RAM, no L2ARC or separate ZIL maybe be impacting performance. SSDs are still a bit too expensive for L2ARC or ZIL. Another 4GB of RAM should be doable however.

The server should go together pretty easily. I still need to purchase some high speed USB drives to act as OS drives for these systems. The cheap HP thumb drives I have now just don’t cut it.

The switch will be a bit of an adventure. I expect I’ll be rebuilding my lab several times over the coming months, one because I expect to be moving in that time, but also as I figure out better ways to set things up, gain a better understanding, etc.

vSphere Essentials Kit

I’ve been looking into some upgrades for my home lab.  I’ve talked myself out of hardware (for the minute) but started looking into vSphere improvements, since I am only running a single ESXi install managed by vSphere Client.

Tomorrow I think I’m going to install a vSphere evaluation license, see whether it’s what I’m really looking for for a home lab learning environment, and perhaps spring for the vSphere Essentials Kit.  (Though waiting the 60-days would probably let a few more dollars make their way into my pocket.)

What I’d really like to know is whether Essentials Kit is really, almost, targeted at home lab setups.  VMware Store – VMware vSphere SMB Options The kit allows for up to 3, dual CPU servers which is just right for a basic lab.  But I can find no examples of what licensing options people are using for their home labs, or if anyone is taking advantage of this great deal.

Thoughts?